Manual setup
NOTE: If you cannot forward outgoing emails via port 25, it is also possible to use port 587. Note that STARTTLS is required on port 587.
Displaying tenant-specific TLS and domain names
To display the TLS and domain names required for your tenant, proceed as follows:
- Go to Configuration > Office 365.
- Select your Office 365 tenant.
- Click Show Exchange configuration.
The relevant information is displayed.
Creating an inbound connector
- Open your Exchange Admin Centre at https://admin.exchange.microsoft.com/.
- Go to Email Flow > Connectors and click Add Connector.

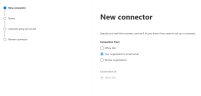
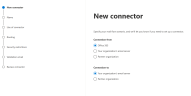
- Under Connection from select Partner organization, under Connection to select Office 365 and click Next.

- Enter From NoSpamProxy as the name for the connector, optionally add a description, place a check mark next to Activate and click Next.

- Select the option By checking whether the sender domain [...], enter * as the sender domain, click the plus sign and then Next.

- Tick the check box next to Reject email messages if [...] and And require that [...].
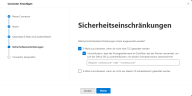
- Specify the required TLS subject name for the Exchange inbound send connector, click Next and then Save.

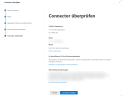
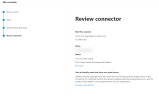
- Confirm the selected settings and click Beenden / Finish.
NOTE: Some email servers still have the old MX record in their cache for up to 24 hours. We therefore recommend that you do not activate the restriction to the applicant name until 24 hours after the MX record has been changed. Otherwise it is possible that emails from Exchange Online will be rejected with 5.7.51.


Creating an outbound connector
- Open your Exchange Admin Centre at https://admin.exchange.microsoft.com/.
- Go to Email Flow > Connectors and click Add Connector.
- Under Connection from, select the option Office 365, under Connection with, select the option Partner organisation and click Next.

- Enter To NoSpamProxy as the name for the connector, optionally add a description, tick the check box next to Activate and click Next.

- Select the option Only when I have a transport rule [...] and click Next.

- Select the option Forward emails through these smart hosts, click the plus sign and specify the smarthost on the outbound Exchange send connector.

- Click Save and then Next.
- Tick the check box next to Always use Transport Layer Security [...] and select the option Issued by a trusted certificate authority (CA).
- Tick the box next to Add the subject name or alternative subject name (SAN) [...] and specify the TLS requester for the outgoing Exchange send connector.

- Click Next.
- Enter one or more email addresses in the following dialogue, click on the plus sign, then click on Check and follow the instructions in the dialogue.


Creating a transport rule
- Open your Exchange Admin Centre at https://admin.exchange.microsoft.com/.
- Go to Email flow > Rules.
- Click Add a rule and then Create a new rule.

- Give the rule the name Outbound mails to NoSpamProxy.

- Under Apply this rule if, set the following options:
- The recipient
- is external/internal
- Outside the organisation

- Under Proceed as follows, select the option Redirect message to and then The following connector.

- Specify the previously created connector To NoSpamProxy and click OK.

- Click Next.
- Leave the settings for your transport rule unchanged and click Next.
- Confirm the selected settings and click Beenden / Finish.


Disabling spam filtering by Office 365
- Open your Exchange Admin Centre at https://admin.exchange.microsoft.com/.
- Go to Email flow > Rules.
- Click Add a rule and then Create a new rule.
- Give the rule the name Disable spam filtering for inbound emails.
- Under Apply this rule if, set the following options:
- The sender
- is external/internal
- Outside the organisation
- Select the following options under Proceed as follows:
- Change message properties
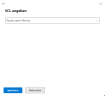
- Set SCL rating (Spam Confidence Level)
- In the following dialogue, select the Bypass spam filtering option under Specify SCL.
- Click Save and then Next.
- Leave the settings for your transport rule unchanged and click Next and then Finish.

Displaying tenant-specific TLS and domain names
To display the TLS and domain names required for your tenant, proceed as follows:
- Go to Configuration > Office 365.
- Select your Office 365 tenant.
- Click Show Exchange configuration.
The relevant information is displayed.
Creating an inbound connector
- Open your Exchange Admin Centre at https://admin.exchange.microsoft.com/.
- Go to Email Flow > Connectors and click Add Connector.
- Under Connection from select Your organization's email server, under Connection to select Office 365 and click Next.
- Enter From NoSpamProxy as the name for the connector, optionally add a description, place a check mark next to Activate and click Next.

- Specify the required TLS subject name for the Exchange inbound send connector, click Next and then Save.

- Confirm the selected settings and click Beenden / Finish.
- Open https://security.microsoft.com/.
- Go to Email & collaboration > Policies and rules > Threat policies > Enhanced filtering (for Connectors).
- Click the connector From NoSpamProxy (without Protection).
- Configure the following options:
- Automatically detect and skip the last IP address
- Apply to entire organization
- Click Save.


NOTE: Some email servers still have the old MX record in their cache for up to 24 hours. We therefore recommend that you do not activate the restriction to the applicant name until 24 hours after the MX record has been changed. Otherwise it is possible that emails from Exchange Online will be rejected with 5.7.51.
Creating an outbound connector
- Open your Exchange Admin Centre at https://admin.exchange.microsoft.com/.
- Go to Email Flow > Connectors and click Add Connector.
- Under Connection from, select the option Office 365, under Connection with, select the option Your organization's email server and click Next.
- Enter To NoSpamProxy as the name for the connector, optionally add a description, tick the check box next to Activate and click Next.

- Select the option Only when I have a transport rule [...] and click Next.

- Specify one or more smart hosts to which Office 365 will send email messages.

- Click Next.
- Tick the check box next to Always use Transport Layer Security [...] and select the option Issued by a trusted certificate authority (CA).
- Tick the box next to Add the subject name or alternative subject name (SAN) [...] and specify the TLS requester for the outgoing Exchange send connector.

- Click Next.
- In the following dialog, enter one or more email addresses, click Check and follow the instructions in the dialog.


Creating a transport rule: Accepting emails from the inbound NoSpamProxy Cloud connector
- Open your Exchange Admin Centre at https://admin.exchange.microsoft.com/.
- Go to Email flow > Rules.
- Click Add a rule and then Create a new rule.
- Give the rule the name From NoSpamProxy (without Protection).
- Under Apply this rule if, set the following options:
- The message headers...
- includes any of these words
- Click Enter text and enter the value X-NoSpamProxy-Office365Identification.
- Click Enter words and enter the required value for the header. See How do I find the required value for the header?
- Under Do the following, set the options Modify the message properties and Remove a message header and enter the value X-NoSpamProxy-Office365Identification.
- Click the plussign .
- Under Do the following, set the options Modify the message properties and set the spam confidence level (SCL) , and under Set SCL select the option Bypass spam filtering.
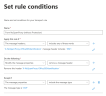
- Under Except if, set the options The message properties and include the message type and enter the value Automatic reply. The dialog should now look like this:
- Click Next and tick the Stop processing more rules box.
- Leave the other settings for this transport rule unchanged and click Next.
- Confirm the selected settings and click Finish.

Creating a transport rule: Route outbound emails to NoSpamProxy
- Open your Exchange Admin Centre at https://admin.exchange.microsoft.com/.
- Go to Email flow > Rules.
- Click Add a rule and then Create a new rule.
- Give the rule the name Outbound Mails to NoSpamProxy (without Protection).
- Under Apply this rule if, set the following options:
- The recipient
- is external/internal
- Outside the organization
- Under Proceed as follows, set the options Redirect message to and the following connector and specify the previously created connector To NoSpamProxy.
- Also under Do the following, click the plus sign and select the options Modify the message properties and set a message header.
- Click Enter text and enter the value X-NoSpamProxy-Office365Identification.
- Click Enter words and enter the required value for the header. See How do I find the required value for the header?
- Under Except if, set the options The message properties and include the message type and enter the value Automatic reply. The dialog should now look like this:

- Click Next and tick the Stop processing more rules box.
- Leave the other settings for this transport rule unchanged and click Next.
- Confirm the selected settings and click Finish.

Creating a transport rule: Route inbound emails to NoSpamProxy
- Open your Exchange Admin Centre at https://admin.exchange.microsoft.com/.
- Go to Email flow > Rules.
- Click Add a rule and then Create a new rule.
- Give the rule the name Inbound Mails to NoSpamProxy (without Protection).
- Under Apply this rule if, set the following options:
- The recipient
- is external/internal
- Inside the organization
- Click the plus sign and also set the following options under Apply this rule if:
- The sender
- is external/internal
- Outside the organization
- Under Do the following, set the options Redirect message to and the following connector and specify the previously created connector To NoSpamProxy.
- Also under Do the following, click the plus sign and select the options Modify the message properties and set a message header.
- Click Enter text and enter the value X-NoSpamProxy-Office365Identification.
- Click Enter words and enter the required value for the header. See How do I find the required value for the header?
- Under Except if, set the options The message properties and include the message type and enter the value Automatic reply. The dialog should now look like this:

- Leave the settings for this transport rule unchanged and click Next.
- Confirm the selected settings and click Finish.

How do I find the required value for the header?
- Go to Configuration > Office 365.
- Select your Office 365 tenant.
- Click Show Exchange configuration.
- (Optional) Copy the required value for the header to the clipboard.
- Click Close.
NOTE: Note your existing Exchange configuration. These instructions change the email traffic without restrictions.