Using NoSpamProxy in Microsoft 365 with Exchange Online
If you use NoSpamProxy® in Microsoft 365 in conjunction with Exchange Online, you must make additional settings in your tenant to ensure spam prevention.
Step 1: Creating an inbound connector for the domain *
To stop the delivery of unwanted emails from the Internet, create an inbound connector. This connector allows for the domain * only emails from specific IP addresses, i.e. your own email server or NoSpamProxy. A corresponding partner connector is required for this.
To create the partner connector in PowerShell, type the following:
WARNING: To ensure spam protection through NoSpamProxy®, you must route all inbound email traffic through NoSpamProxy and address Microsoft 365 exclusively through NoSpamProxy using a dedicated connector. Otherwise, it is possible that the anti-spam functionalities of NoSpamProxy and Exchange Online Protection (EOP) will interfere with each other. We strongly recommend that you make the following setting, otherwise the security and stability of your configuration cannot be guaranteed.
TIP: Instead of the IP address, you can also store the certificate of the supplying gateway.
To create the partner connector via the Exchange Control Panel, proceed as follows:
- Go to Email Flow > Connectors and click Add Connector.

- In the dialog box, select Partner organization and Office 365, and then click Next.

- In the New Connector dialog, enter a name for the connector and add a description if required. Leave the tick next to Activate. Then click Next.

- In the following dialogue window, select the option By checking whether the sender domain [...].

- Enter an asterisk ("*") as the domain name and then click on the plus sign

- On the following page, tick the Reject emails if they are not sent from this address range box, enter the IP address of the server on which the Gateway Role is installed and click the plus sign.

- Verify that the information in the summary is correct and click OK.


The new connector now appears under Email flow > Connectors.
Step 2: Creating a transport rule to deactivate the spam filter
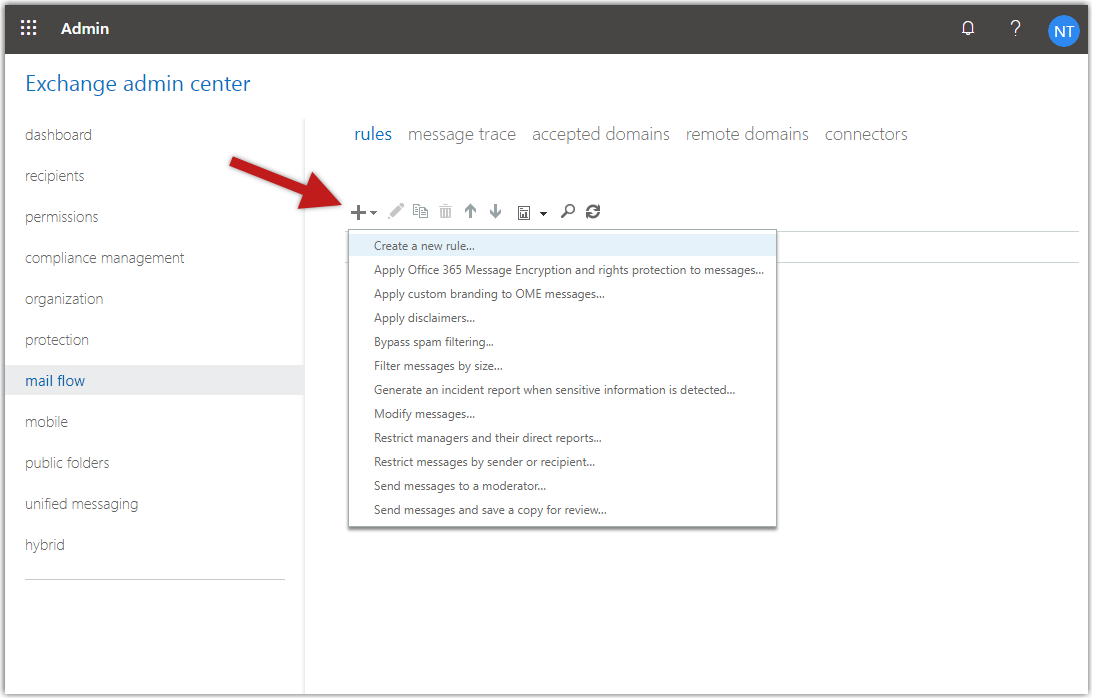
- Go to Email flow > Rules.
- Click Add a rule and then Create a new rule.
- Give the rule a name.

- Under Apply this rule, select if the option The sender and then IP is in one of these ranges or matches exactly.

- In the Specify IP address ranges dialogue, enter the IP address of the server on which the gateway role is installed, click Add and then Save.

- Select the following options under Proceed as follows:
- Change message properties
- Set SCL rating (Spam Confidence Level)
- In the following dialogue, select the Bypass spam filtering option under Specify SCL.
- Click Save and then Next.
- Leave the settings for your transport rule unchanged and click Next and then Finish.


The rule is now set up. Spam protection for the use of NoSpamProxy in Microsoft 365 with Exchange Online is ensured.
Next steps
Now continue with the following steps:
Necessary configurations for the operation in Microsoft Azure